A complete guide to Toes To Bar
Everything you need to know about Toes to Bar (T2B). Toes to bar (sometimes written as TTB or T2B) is a staple for anyone who trains functional fitness and is


Everything you need to know about Toes to Bar (T2B). Toes to bar (sometimes written as TTB or T2B) is a staple for anyone who trains functional fitness and is
Toes to bar (sometimes written as TTB or T2B) is a staple for anyone who trains functional fitness and is often the first skill learned on a pull up bar.
The name alone makes the exercise sound easy enough, but be aware that you need the proper strength, mobility, flexibility and coordination to pull it off.
If you're looking to get your first toes to bar, string together multiple reps or, if you simply want to improve your efficiency, this guide is for you!
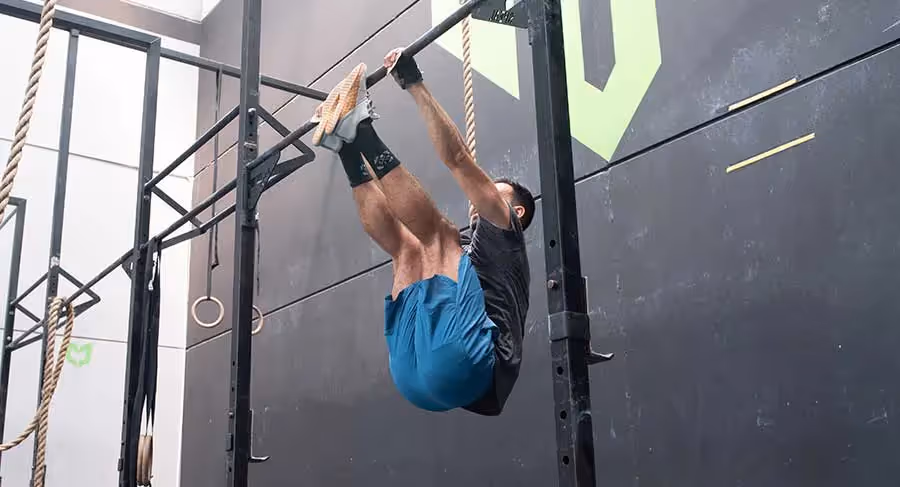
Luckily, this gymnastics-based movement is just as straight forward as it sounds; hanging from a pull up bar, bring your feet to touch the bar in between your hands. Your arm should stay locked out and both feet should make contact with the bar simultaneously.
Toes to bar can be performed strict or with kipping.
In both variations, the movement requires coordination as well as plenty of core and upper body strength.
It is easily one of the most popular movements used in functional fitness because it can be completed at high volumes and is relatively easy to scale according to the athlete’s ability.
As with many gymnastic movements, it's a good idea to learn how to perform the exercise strict before involving any swinging or rebounding.
This allows us to develop adequate strength and control and can also reduce the possibility of injury.
In fact, even when you’ve mastered toes to bar with kipping, you’ll continue to see improvements in both variations if you continue to practice them strict.
This tutorial primarily focuses on the kipping variation, however many of the cues carry over between both variations.
For competitive fitness athletes, this is the default variation.
It involves swinging from the bar using a controlled yet explosive interchange of hollow and arch positions to efficiently perform consecutive reps. Kipping more common than strict TTB because the momentum in the kip swing can help the athlete to complete high volume repetitions with less midline and shoulder fatigue.
That said, it’s important to make sure beforehand that you have adequate shoulder stability to support the dynamic nature of the swing.
When it comes to kipping, we need to understand two positions: hollow and arch.
If we can control passing through these two positions while keeping the core and shoulders engaged, we can kip on the bar. It can be very helpful to do some static holds of these positions on the floor before getting up on the bar.
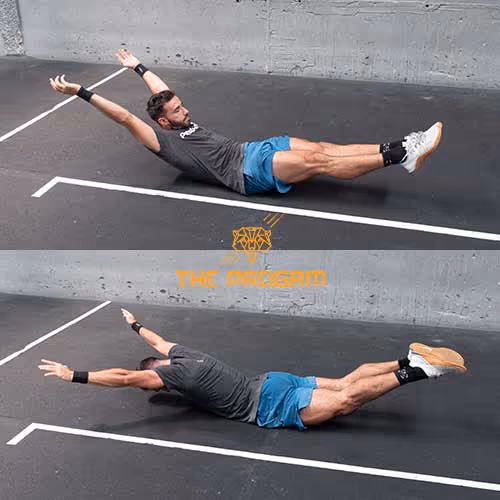
Jump to the bar with hands about shoulder with apart. Get your hands completely around the bar and re-grip as necessary. Keeping your thumb over your fingers can help maximize shoulder stability and take advantage of grip strength which equal more endurance on the bar.
Initiate the kip by switching between hollow and arch positions. Keep your stomach in as you pull your ribcage down towards your pelvis (hollow position). Then, squeeze your scaps together, tighten your glutes and keep your hips and legs long as they drift behind your back (arch position). From a lateral view, your chest and your feet should always be on opposite sides of the bar.

Let your arms act as levers: Lean back as you pull the bar down towards your chest without bending your arms. This should activate your lats and elevate your chest, resulting in a hollow position that is [slightly] parallel to the floor. This is our lever position.
Keep your arms, shoulders, and lats strong as you draw your knees in toward your chest (or just over your elbows) and slightly extend your knees to “flick” the bar with your feet.
Push against the bar as you bring your lower body down, returning to arch position. It’s crucial that you keep tension in the descent so that you can keep the momentum of the kip and connect reps.
Toes to bar is a very complete exercise with he potential to develop a range of body parts all at once. Especially when performed strict and with focus on quality, this movement works great to strengthen the abs, hip flexors, back and arms.
Development in these areas transfer well not only to other, more advanced movements commonly used in competitive fitness but also to skills that are specific other sports.
[adinserter block="2"][adinserter block="4"]
As a body weight exercise, the kipping variation can be used to improve muscular endurance and even aerobic capacity (once the movement has been mastered!).
As mentioned earlier, toes to bar is fairly easy to scale; it’s just a matter of getting a good beat going with the kip swing and reducing the space between the bar and your feet little by little.
Remember, even though the final objective is to get your toes to make contact, what’s more important is that you can do so without losing the rhythm of the kip.
That's to say, it’s better to stick to a scaled version in which your knees and toes reach the same height every time rather than making contact with the bar inconsistently or swinging uncontrollably
Let's look at the progressions from easiest to more difficult.
Keep in mind that being able to do toes to bar RX is a process that takes practice!
When you’re able to connect 8-12 reps consistently, you're probably ready to move on to the next progression.
This variation is a great first step to understanding how to coordinate your lower body in the exercise while maintaining a rhythmic kipping swing.

This is position is very similar to one known as a tuck lever and although it is possible to do a full toes to bar without it (In fact some coaches prefer the movement to be done in a “pike” position with straight legs) it's definitely useful for completing large sets of reps.
When you're comfortable with getting your knees up and maintaining a consistent kip, it's time to move on to this progression.
In this progression, we’re looking for more inclination in our tuck lever position. This way, the lower body will get closer to the bar however we’ll need to make a few adjustments to help get us there.
Stronger shoulder and lat activation to keep our chest behind the bar and a little more core strength to keep the shoulders, torso and lower body elevated.
The result is a tuck lever that is more parallel to the floor than in the previous progression.
As you get into the lever position, separate you knees and use them to make contact with your elbows before returning to arch position.
Since we are increasing the range of motion, the timing of the kip will be a little different but it's still crucial that the movement is controlled and rhythmic.
The difference between knees to elbow and toes to bar is very slight.
If you’re able to touch your knees to your elbows there are only a few centimeters between your feet and the bar.
This is where we incorporate the feet flick. Just as your knees reach the height of your elbows, extend your knees to make brief contact with the bar.
Similarly, to how we passed from the previous progression to this one, by increasing the movement’s range of motion of the movement, we’ll have to adjust the timing and amplitude of our kip.
The key to efficiency is a solid base.
Maybe you have a few reps on a “good day” but struggle to maintain the rhythm or range of motion once a bit of fatigue sets in.
If you want to be able to knock out a set every time you jump up to the bar, you'll need to do more than just practice your kipping toes to bar over and over again.
We have to build a foundation to help us improve our control, strength, and coordination.
Here are some exercises that can help.
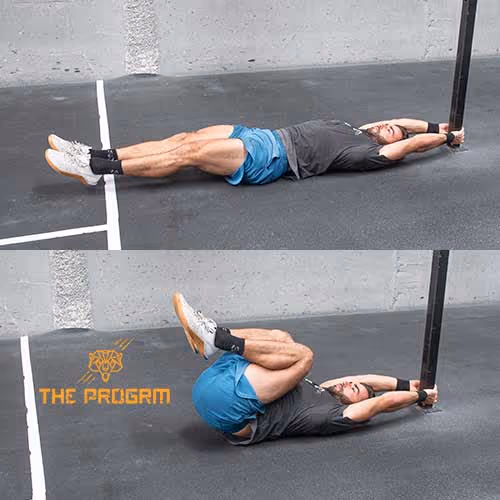
This exercise can be especially useful as first step to anyone looking to get their first reps.
It is a good assessment of hamstring flexibility that will also allow you to work your hip flexors and lower abs at the same time. These are crucial areas to help you achieve that full range of motion.
We can make this exercise more challenging by performing while hanging which has the added bonus of working our grip, hanging endurance, and developing lat strength.
If you want to focus even more on core strength, this accessory can also be performed while maintaining straight legs.
Sitting at a ninety-degree angle with the floor, bring yourself up onto the paralettes.
Allow your knees to bend slightly as you support yourself. Keep your chest vertical, pull your shoulders down away from your ears and lock your arms.

Little by little, bring your toes off of the ground and hold for 10-30 seconds. Scale up by completely extending your legs without touching the floor. Scale down by extending your legs but keeping your heels on the ground.
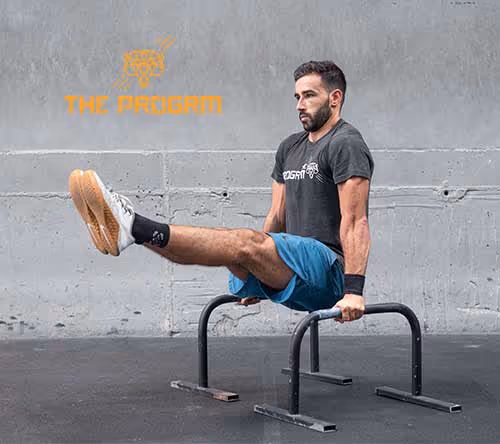
This accessory will help us to improve compression; the ability to create and maintain tension in the body. If you can manage to use your core to stay tense, we can reduce the possibility of shoulder/lat burn out and we can also cycle the movement faster.
Conclusion
Toes to bar can be a very frustrating movement especially if you fall short of achieving contact with the bar. By applying the progressions and accessories outlined in this guide, you’ll be able to make progress towards getting your first reps or connecting larger sets. Don’t be afraid to scale and put in the extra strength work. In the long run it pays to respect the progressions if you want to truly master the movement.
John Singleton, the founder of The Progrm, is known for training elite athletes, including many of Europe’s top CrossFit Games competitors. With a Master’s degree in Osteopathy, John combines science-based programming with a focus on performance and recovery. Based in Mallorca, Spain, he leads a global community dedicated to helping athletes optimize performance and longevity in the sport.